If you’ve worked in Flash and become accustomed to symbols and movie clips for managing your animations, this guide will prepare you for the easy transition into HTML5 animation with Tumult Hype. This guide is written by Nick Gressle.
Also check out the Character Animation guide for Flash converts.
Hi! My Name is Nick and I built my first animations in Flash years ago and continued building learning modules and games in Flash until I discovered Hype. When explaining why I use Hype Professional now as opposed to Flash I like to show potential users that the learning curve from the old to the new is not that difficult to master. Today I’ll be discussing the similarities and differences between the Flash MovieClip Symbol and Hype’s Symbols.
What is a Flash Movie Clip?
A Flash MovieClip is one of the three symbols: Graphic, Button or MoveClip, that allows you to make instances of animation, images and interaction.
With the movie clip symbol you can create reuseable pieces of animation that include…
- Multiframe Timelines that are independent of the main timeline.
- Interactive controls
- Sounds
- Graphic symbols
- Button symbols
- Text elements
- Additional Movie Clips
- … and these symbols are scriptable with Actionscript 3.0
Flash also uses the MovieClip symbol as a specialized element called a Component. These are MovieClips with defined parameters that accept other user interface items such as check boxes, radio buttons, scrollbars etc.
Movie Clip Characteristics
Movie Clips on the surface look like the other symbols in Flash.
- You can drag instances of them to the stage.
- Make multiple instances of them on the stage.
- Independent Scaling
- Independent Tinting
- Independent Alpha effects
- Independent Rotation
So as you can see MovieClips behave like Flash movies within a Movie. One note about MovieClips: while they are independent movies within the overall movie, their frame rate is governed by the global Flash Movie frame rate.
To create slower or faster animation in movies clips from the main timeline you need to adjust the length of your tween elements to get your desired effect.
Why organize your animation into Movie Clips?
Flash animations can get very large and complex quickly. If you were to do all of your work on the main timeline the organization of your symbols, tweens and interactive devices would become very cumbersome for any future editing. By organizing your animation into Movie Clip Symbols you can organize your movie into easy component parts that make future edits or team edits much easier.
What are Tumult Hype’s ‘Symbols?’
Where Flash has created three distinct symbols (graphics, buttons and Movie Clips). Hype classifies the Symbol as “scenes-within-a-scene for component reuse and to help manage document complexity.”
In this way a Symbol is very much like a Flash Movie Clip. It can have its own timeline that can act independently from the main timeline. And it can be extended with Javascript or custom Behaviors built in Hype. A Symbol can also be rotated and flipped along it’s X, Y and Z axis. You can also adjust its opacity as well. And just like the MovieClip in Flash, it can be enhanced with Hype’s built in filter effects such as
- Blur
- Sepia tinting
- Saturation
- Hue
- Brightness and Contrast
Why Use Hype Symbols?
Similar to the use of the Movie Clip in Flash, Symbols help organize your Hype document into manageable parts and components. By creating symbol-based animations you gain more editing control over your document as well as making it easier to target specific animations and elements with Hype Actions, Behaviors and Javascript Functions.
For instance if you wanted to make an animation of a character walking in a scene with the following traits…
- Main Character animated walk cycle
- Background city scene with animated characters
- Sky with Clouds moving through the sky
Putting all of that on one timeline or even multiple timelines within a scene would make for a very complicated project. Breaking each one of these 3 individual animations out into individual symbols helps keep separate components organized.
Each symbol would then have it’s own timeline set that could be identified with that symbol for example…
- Symbol “Character” | Character timeline: Walk_cycle, Arm movement, eyes blinking.
- Symbol “Background City” | Background City timeline: Buildings, Cars, People
- Symbol “Sky” | Sky timeline: Blue sky, Sun animation, Cloud animation
Now your main timeline is organized and easily accessible:

Within each Symbol, you can also further organize animations for one of your component parts: symbols can contain multiple timelines just like a regular scene in Hype.
Comparing Flash “symbols” and Hype “symbols” and elements
Flash categorizes all objects as symbols in it’s environment. For example a line segment is a graphic symbol, Text is a symbol, a button is a symbol, and a movie clip is a symbol.
Flash defines a symbol as a reusable image, animation, graphic, movie clip, sound file, font or button that resides in the Flash library. However, imported graphics such as bitmaps, jpgs, pngs are not considered as symbols and cannot be controlled like a Flash symbol.
In the Hype environment, elements on the scene exist in HTML’s DOM, so we Tumult calls them Elements. Buttons are elements, boxes are elements, and circles and text are all also classified as elements. Unlike Flash, a placed image such as a JPG, SVG, or PNG is considered a Hype element and can be controlled by JavaScript or by controls in one of the inspectors.
Symbols and Persistent Symbols
As we have mentioned above Hype Symbols can be as complex as a full length animation and then re-used much like a Flash Movie Clip or they can be as simple as an animated button that can be reused throughout your document. But there is one more type of Symbol in Hype: the Persistent Symbol.
The persistent symbol is a special type of symbol that can be used across all of your scenes. The best use of a persistent symbol would be a menu animation or a series of buttons that should be on every page of a website.
When you create a persistent symbol, Hype gives you the option of creating the persistent symbol across all scenes that you create or on just the current scene you are on at that moment. Only one instance of a persistent symbol can exist on your scene at one time.
It is also interesting to note that the persistent symbol can mimic the same functionality as the Flash Component. This can be done by making customized elements such as text boxes, check boxes and specialized buttons that can be stored for future use in the Resources Folder.

Comparison chart for Movie Clips and Hype Symbols
The chart below outlines the similarities and differences between Flash Movie Clips and Tumult Hype’s Symbols:

Creating and editing a movie clip vs creating and editing a Hype symbol
The basic setup for making a Movie Clip in Flash is to either convert a shape or animation into a Movie Clip or by creating a new symbol from the insert menu or the menu from the library. Once you create the symbol you can drag it from the library onto your stage for use in your project. In Hype you do something very similar. If you create an animation on any of your scenes you can select the elements and then go to the Symbols menu item and “create a new symbol from selection.”
The second method is to create a new symbol and then populate it with elements or a new animation. To do this go to the Symbols menu and select “New Symbol”.

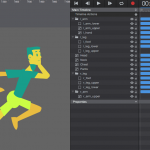
This will create a new symbol on Hype’s scene (or stage, as it would be called in Flash). You can tell that there is a symbol on the scene by the display of a purple outlined box. it is labeled as “Symbol” and has a help tip on it to help you begin your editing.

Editing is very similar to the way you edit a movie clip in Flash.
To extend the physical size of a symbol select the symbol by clicking on it. You will then see resizing handles on the top, bottom and sides. Click and drag on any of the handles to extend the symbol dimensions to any size you need.
Remember that symbol contents have a bounding box just like groups: by setting ‘Content Overflow’ to ‘Hidden’ in the Metrics inspector, you can adjust how much of your symbol appears. If you resize the box too small it will crop the view of your symbol elements.
If you want to access the contents of a symbol all you need to do is double click the symbol. After you do that you will see that the timeline now gets a purple header showing you that you are in symbol editing mode.

At this time you can then build a new animation or just place elements within the symbol container. To move back into your main timeline all you have to do is click the X icon on the symbol header, and you are back to the Main Timeline.
The Hype Resources Folder
There is one last comparison to Flash and the Flash Movie Clip. In Flash you access all of your movie clip, graphic and button symbols from the Library. Hype organizes all of your symbols and persistent symbols in a the Resources pane alongside each video, image, JavaScript function, and audio file.

The Resource library makes it easy to duplicate symbols: simply click on your symbol instance in the Resources Folder window and drag it to your stage.
Tip: Creating a Hype Template with utility symbols stored in your Resource library (such as drop down menus, buttons, etc.) is a great way to save time when starting a new Hype Project!
Creating a Symbol in Hype
Thanks for reading!
Nick